前段时间偶然发现了 scaleway 这个服务商,它提供了一个 ipv6 服务器(1C1M),一个月只要 0.4 欧,一年换算下来才 30 多 RMB。简直不要太划算,所以就立马着手进行操作,这里记录一下操作流程。
需求条件
一台能够接入 ipv6 网络的电脑
一个 cloudflare 账号
一个 scaleway 账号(注册时需要支持外币的信用卡)
由于我的家用网络没有 ipv6(刚开始不知道没有 ipv6,一直失败给我整麻了),所以我是用一台支持 ipv6 的服务器作为跳板来进行操作的。
下载命令行工具
使用 scaleway 官方 api 进行服务器相关操作
下载命令行工具
wget https://github.com/scaleway/scaleway-cli/releases/download/v2.10.0/scaleway-cli_2.10.0_linux_amd64 -O /usr/local/bin/scw赋予可执行权限
chmod +x /usr/local/bin/scw生成 ssh 密钥对(optional)
如果你已经有了密钥对,可以不用再申请
ssh-keygen -t ed25519 -C "ipv6 test"测试是否安装成功
执行以下命令,若无错误提示即成功
scw -hAPI key 申请
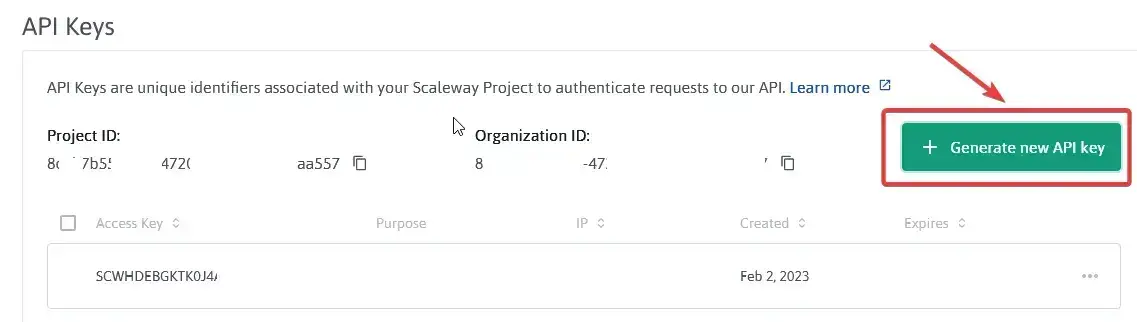
我们需要申请一个 API 密钥用来在命令行登陆验证账号
浏览器打开 https://console.scaleway.com/project/credentials,如图点击按钮申请
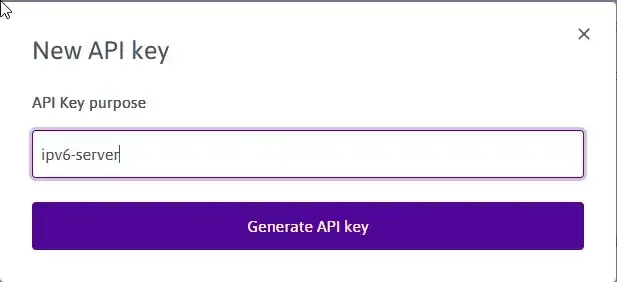
然后输入用途描述,可以随便写
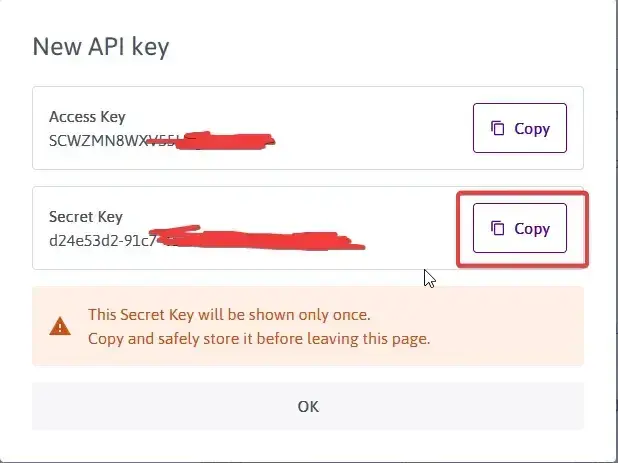
点击生成之后会出现下面的窗口,复制其中的Secret Key字段(注意这个字段只出现一次,如果忘记需要重新申请),点击OK即可。
初始化配置
执行scw init初始化设置
root@Cloud:~# scw init

                                   @@@@@@@@@@@@@@@.
                                 @@@@@@@@@@@@@@@@@@@@        __          __  _
                                 @@@               @@@@      \ \        / / | |
                                 @@@    @@@@@@@     .@@@      \ \  /\  / /__| | ___ ___  _ __ ___   ___
                                 @@@   @@@@@@@@      @@@       \ \/  \/ / _ \ |/ __/ _ \| '_ ` _ \ / _ \
                                 @@@   @@@           @@@        \  /\  /  __/ | (_| (_) | | | | | |  __/
                                 @@@   @@@     @@@   @@@         \/  \/ \___|_|\___\___/|_| |_| |_|\___|
                                 @@@   @@@     @@@   @@@                                         _  _
                                 @@@           @@@   @@@                                        | |(_)
                                 @@@      .@@@@@@@   @@@             ___   ___ __      __   ___ | | _
                                 @@@      @@@@@@@    @@@            / __| / __|\ \ /\ / /  / __|| || |
                                  @@@.               @@@            \__ \| (__  \ V  V /  | (__ | || |
                                   @@@@@@.         .@@@@            |___/ \___|  \_/\_/    \___||_||_|
                                      @@@@@@@@@@@@@@@@.

------------------------------------------------------------------------------------------------------------------------------------------

Enter a valid secret-key:  xxxxxxxx-xxxx-xxxx-xxxx-xxxxxxxxxxxx

To improve this tool we rely on diagnostic and usage data.
Sending such data is optional and can be disabled at any time by running "scw config set send-telemetry=false".
Do you want to send usage statistics and diagnostics? (Y/n): n

To fully enjoy Scaleway CLI we recommend you install autocomplete support in your shell.
Do you want to install autocomplete? (Y/n): n
Creating new config at /root/.config/scw/config.yaml
Config saved at /root/.config/scw/config.yaml:
access_key: SCWHDEBGKTK0J4A13FV8
secret_key: xxxxxxxx-xxxx-xxxx-xxxx-xxxxxxxxxxxx
default_organization_id: 00000000-0000-0000-0000-000000000000
default_project_id: xxxxxxxx-xxxx-xxxx-xxxx-xxxxxxxxxxxx
default_region: fr-par
default_zone: fr-par-1

An SSH key is required if you want to connect to a server. More info at https://www.scaleway.com/en/docs/configure-new-ssh-key
We found an SSH key in ~/.ssh/id_ed25519.pub. Do you want to add it to your Scaleway account? (Y/n): Y

✅ Initialization completed with success.
按照提示输入生成的 API 密钥/是否同意分析匿名数据/是否安装命令行自动补全,根据需求输入Y/N就行,至于最后一步是否添加 SSH key 到账户,建议选择Y,否则需要自己手动在网页控制台添加。
到这里所有的账户配置就已经完成了,接下来就是申请服务器了,这个就很简单了。
申请服务器
建议申请荷兰的服务器,法国的很难申请,要看运气。
scw instance server create type=STARDUST1-S zone=nl-ams-1 image=debian_bullseye root-volume=l:10G name=Debian ip=none ipv6=true project-id=8c2b7b55-a411-4720-8f40-204bb89aa557这里会提示一串服务器相关信息,无论你是否申请成功。
执行下面的命令测试是否安装成功
root@cloud:~# scw instance server list zone=nl-ams-1
ID                                    NAME    TYPE         STATE    ZONE      PUBLIC IP  PRIVATE IP   TAGS  IMAGE NAME
xxxxxxxx-xxxx-xxxx-xxxx-xxxxxxxxxxxx  Debian  STARDUST1-S  running  nl-ams-1  -          10.19.68.73  []    Debian Bullseye
如果状态是 starting,稍等几秒再执行一次。
如果状态是 running,说明安装成功。
如果状态是 archived,说明创建失败,删除然后重新申请即可。
ssh-keygen -t ed25519

scw init

6d40b8e5-2797-4527-b8ce-2a2cfc41ad18

scw instance server create type=STARDUST1-S zone=nl-ams-1 image=debian_bullseye root-volume=l:10G name=Debian ip=none ipv6=true project-id=8c2b7b55-a411-4720-8f40-204bb89aa557

scw instance server create type=STARDUST1-S zone=fr-par-1 image=debian_bullseye root-volume=l:10G name=Debian ip=none ipv6=true project-id=8c2b7b55-a411-4720-8f40-204bb89aa557
配置服务器
ssh 连接服务器
服务器的 ipv6 地址可以在网页控制台查看,与一般服务器连接不一样的是,scaleway 的服务器只支持使用 public key 来进行验证登陆,不支持密码登陆。
root@cloud:~# ssh-agent bash
root@cloud:~# ssh-add
Enter passphrase for /root/.ssh/id_ed25519:
Identity added: /root/.ssh/id_ed25519 (root@racknerd-07bcb2)
root@cloud:~# ssh root@<ipv6 address>
Linux Debian 5.10.0-20-cloud-amd64 #1 SMP Debian 5.10.158-2 (2022-12-13) x86_64

The programs included with the Debian GNU/Linux system are free software;
the exact distribution terms for each program are described in the
individual files in /usr/share/doc/*/copyright.

Debian GNU/Linux comes with ABSOLUTELY NO WARRANTY, to the extent
permitted by applicable law.
root@Debian:~#
使用 WARP 获取 ipv4
这里我是用的开源脚本进行安装配置的,使用起来很简单
运行安装脚本 按照提示操作即可
安装过程(较长)
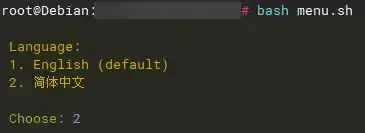
root@Debian:~# wget -N https://raw.githubusercontent.com/fscarmen/warp/main/menu.sh && bash menu.sh
Language:
1. English (default)
2. 简体中文
Choose: 2
所有依赖已存在,不需要额外安装
检查环境中……
本项目专为 VPS 添加 wgcf 网络接口,详细说明: [https://github.com/fscarmen/warp]
脚本特点:
• 支持 WARP+ 账户,附带第三方刷 WARP+ 流量和升级内核 BBR 脚本
• 普通用户友好的菜单,进阶者通过后缀选项快速搭建
• 智能判断操作系统: Ubuntu 、Debian 、CentOS、 Alpine 和 Arch Linux,请务必选择 LTS 系统
• 支持硬件结构类型: AMD、 ARM 和 s390x
• 结合 Linux 版本和虚拟化方式,自动优选4个 WireGuard 方案。网络性能方面: 内核集成 WireGuard > 安 装内核模块 > wireguard-go
• 智能判断 WGCF 作者 github库的最新版本 (Latest release)
• 支持 WARP Linux Socks5 Client
• 输出执行结果,提示是否使用 WARP IP ,IP 归属地和线路提供商
======================================================================================================================
脚本版本:2.46 功能新增:通过 [warp s 4/6/d] 来切换 IPv4 / IPv6 的优先级别
系统信息:
当前操作系统:Debian GNU/Linux 11 (bullseye)
内核:5.10.0-20-cloud-amd64
处理器架构:amd64
虚拟化:kvm
IPv4:
IPv6: 2001:bc8:1830:224::1 Scaleway
WARP 网络接口未开启
Client 未安装
WireProxy 未安装
======================================================================================================================
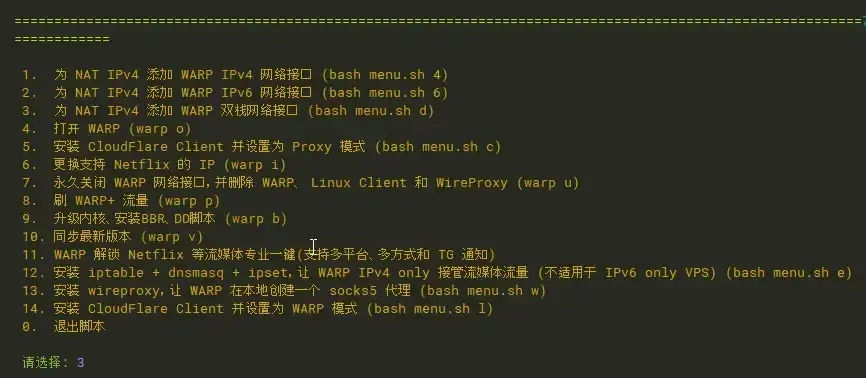
1. 为 NAT IPv4 添加 WARP IPv4 网络接口 (bash menu.sh 4)
2. 为 NAT IPv4 添加 WARP IPv6 网络接口 (bash menu.sh 6)
3. 为 NAT IPv4 添加 WARP 双栈网络接口 (bash menu.sh d)
4. 打开 WARP (warp o)
5. 安装 CloudFlare Client 并设置为 Proxy 模式 (bash menu.sh c)
6. 更换支持 Netflix 的 IP (warp i)
7. 永久关闭 WARP 网络接口,并删除 WARP、 Linux Client 和 WireProxy (warp u)
8. 刷 WARP+ 流量 (warp p)
9. 升级内核、安装BBR、DD脚本 (warp b)
10. 同步最新版本 (warp v)
11. WARP 解锁 Netflix 等流媒体专业一键(支持多平台、多方式和 TG 通知)
12. 安装 iptable + dnsmasq + ipset,让 WARP IPv4 only 接管流媒体流量 (不适用于 IPv6 only VPS) (bash menu.sh e)
13. 安装 wireproxy,让 WARP 在本地创建一个 socks5 代理 (bash menu.sh w)
14. 安装 CloudFlare Client 并设置为 WARP 模式 (bash menu.sh l)
0. 退出脚本
请选择: 3
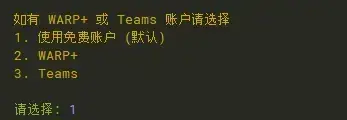
如有 WARP+ 或 Teams 账户请选择
1. 使用免费账户 (默认)
2. WARP+
3. Teams
请选择: 1
请选择优先级别:
1. IPv4
2. IPv6
3. 使用 VPS 初始设置 (默认)
请选择: 3
进度 1/3: 安装系统依赖……
--2023-02-03 07:45:30-- https://github.com/ViRb3/wgcf/releases/download/v2.2.15/wgcf_2.2.15_linux_amd64
Resolving github.com (github.com)... failed: No address associated with hostname.
wget: unable to resolve host address ‘github.com’
--2023-02-03 07:45:30-- https://raw.githubusercontent.com/fscarmen/warp/main/wgcf/wgcf_2.2.15_linux_amd64
Resolving raw.githubusercontent.com (raw.githubusercontent.com)... 2606:50c0:8000::154, 2606:50c0:8001::154, 2606:50c0:8002::154, ...
Connecting to raw.githubusercontent.com (raw.githubusercontent.com)|2606:50c0:8000::154|:443... connected.
Hit:1 http://ppa.launchpad.net/scaleway/stable/ubuntu focal InRelease
Get:2 https://dl.cloudsmith.io/public/caddy/stable/deb/debian any-version InRelease [7,505 B]
Hit:3 http://security.debian.org/debian-security bullseye-security InRelease
Hit:4 http://deb.debian.org/debian bullseye InRelease
Hit:5 http://deb.debian.org/debian bullseye-updates InRelease
0% [Waiting for headers]200 OK
Length: 8687616 (8.3M) [application/octet-stream]
Saving to: ‘/usr/bin/wgcf’
/usr/bin/wgcf 100%[======================================>] 8.29M --.-KB/s in 0.04s
2023-02-03 07:45:31 (196 MB/s) - ‘/usr/bin/wgcf’ saved [8687616/8687616]
Hit:6 http://deb.debian.org/debian bullseye-backports InRelease
Fetched 7,505 B in 1s (9,123 B/s)
Reading package lists... Done
Building dependency tree... Done
Reading state information... Done
7 packages can be upgraded. Run 'apt list --upgradable' to see them.
W: Target Packages (main/binary-amd64/Packages) is configured multiple times in /etc/apt/sources.list:7 and /etc/apt/sources.list.d/backports.list:1
W: Target Packages (main/binary-all/Packages) is configured multiple times in /etc/apt/sources.list:7 and /etc/apt/sources.list.d/backports.list:1
W: Target Translations (main/i18n/Translation-en_US) is configured multiple times in /etc/apt/sources.list:7 and /etc/apt/sources.list.d/backports.list:1
W: Target Translations (main/i18n/Translation-en) is configured multiple times in /etc/apt/sources.list:7 and /etc/apt/sources.list.d/backports.list:1
Reading package lists... Done
Building dependency tree... Done
Reading state information... Done
iptables is already the newest version (1.8.7-1).
net-tools is already the newest version (1.60+git20181103.0eebece-1).
net-tools set to manually installed.
The following packages will be REMOVED:
resolvconf
The following NEW packages will be installed:
bind9-dnsutils dnsutils openresolv
The following packages will be upgraded:
bind9-libs
1 upgraded, 3 newly installed, 1 to remove and 6 not upgraded.
Need to get 2,120 kB of archives.
After this operation, 975 kB of additional disk space will be used.
Get:1 http://deb.debian.org/debian bullseye/main amd64 openresolv all 3.12.0-1 [25.4 kB]
Get:2 http://security.debian.org/debian-security bullseye-security/main amd64 bind9-libs amd64 1:9.16.37-1~deb11u1 [1,424 kB]
Get:3 http://security.debian.org/debian-security bullseye-security/main amd64 bind9-dnsutils amd64 1:9.16.37-1~deb11u1 [404 kB]
Get:4 http://security.debian.org/debian-security bullseye-security/main amd64 dnsutils all 1:9.16.37-1~deb11u1 [267 kB]
Fetched 2,120 kB in 1s (1,920 kB/s)
apt-listchanges: Reading changelogs...
(Reading database ... 34802 files and directories currently installed.)
Removing resolvconf (1.87) ...
进度 2/3: 已安装 WGCF
resolvconf.postrm: Reboot recommended
(Reading database ... 34785 files and directories currently installed.)
Preparing to unpack .../bind9-libs_1%3a9.16.37-1~deb11u1_amd64.deb ...
Unpacking bind9-libs:amd64 (1:9.16.37-1~deb11u1) over (1:9.16.33-1~deb11u1) ...
Selecting previously unselected package bind9-dnsutils.
Preparing to unpack .../bind9-dnsutils_1%3a9.16.37-1~deb11u1_amd64.deb ...
Unpacking bind9-dnsutils (1:9.16.37-1~deb11u1) ...
Selecting previously unselected package dnsutils.
Preparing to unpack .../dnsutils_1%3a9.16.37-1~deb11u1_all.deb ...
Unpacking dnsutils (1:9.16.37-1~deb11u1) ...
Selecting previously unselected package openresolv.
Preparing to unpack .../openresolv_3.12.0-1_all.deb ...
Unpacking openresolv (3.12.0-1) ...
Setting up bind9-libs:amd64 (1:9.16.37-1~deb11u1) ...
Setting up openresolv (3.12.0-1) ...
Installing new version of config file /etc/dhcp/dhclient-enter-hooks.d/resolvconf ...
Installing new version of config file /etc/network/if-down.d/resolvconf ...
Installing new version of config file /etc/network/if-up.d/000resolvconf ...
Installing new version of config file /etc/ppp/ip-down.d/000resolvconf ...
Installing new version of config file /etc/ppp/ip-up.d/000resolvconf ...
Setting up bind9-dnsutils (1:9.16.37-1~deb11u1) ...
Setting up dnsutils (1:9.16.37-1~deb11u1) ...
Processing triggers for libc-bin (2.31-13+deb11u5) ...
Processing triggers for man-db (2.9.4-2) ...
Reading package lists... Done
Building dependency tree... Done
Reading state information... Done
The following NEW packages will be installed:
wireguard-tools
0 upgraded, 1 newly installed, 0 to remove and 6 not upgraded.
Need to get 86.2 kB of archives.
After this operation, 327 kB of additional disk space will be used.
Get:1 http://deb.debian.org/debian bullseye/main amd64 wireguard-tools amd64 1.0.20210223-1 [86.2 kB]
Fetched 86.2 kB in 0s (196 kB/s)
Selecting previously unselected package wireguard-tools.
(Reading database ... 34824 files and directories currently installed.)
Preparing to unpack .../wireguard-tools_1.0.20210223-1_amd64.deb ...
Unpacking wireguard-tools (1.0.20210223-1) ...
Setting up wireguard-tools (1.0.20210223-1) ...
wg-quick.target is a disabled or a static unit, not starting it.
Processing triggers for man-db (2.9.4-2) ...
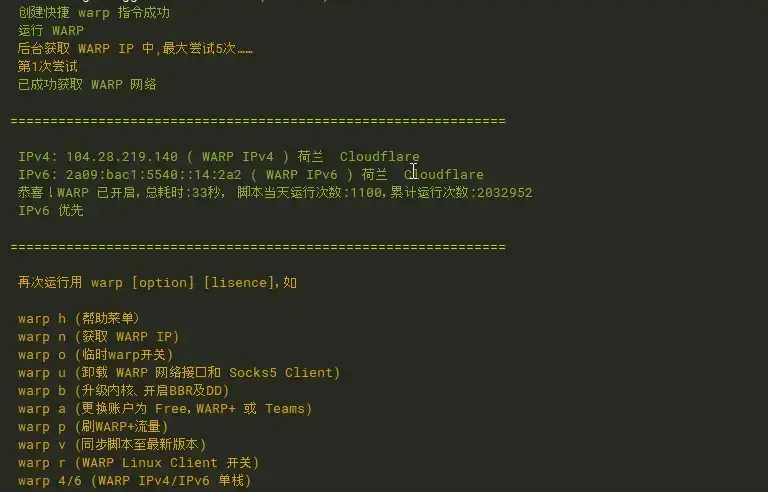
创建快捷 warp 指令成功
运行 WARP
后台获取 WARP IP 中,最大尝试5次……
第1次尝试
已成功获取 WARP 网络
==============================================================
IPv4: 104.28.219.140 ( WARP IPv4 ) 荷兰 Cloudflare
IPv6: 2a09:bac1:5540::14:2a2 ( WARP IPv6 ) 荷兰 Cloudflare
恭喜!WARP 已开启,总耗时:33秒, 脚本当天运行次数:1100,累计运行次数:2032952
IPv6 优先
==============================================================
再次运行用 warp [option] [lisence],如
warp h (帮助菜单)
warp n (获取 WARP IP)
warp o (临时warp开关)
warp u (卸载 WARP 网络接口和 Socks5 Client)
warp b (升级内核、开启BBR及DD)
warp a (更换账户为 Free,WARP+ 或 Teams)
warp p (刷WARP+流量)
warp v (同步脚本至最新版本)
warp r (WARP Linux Client 开关)
warp 4/6 (WARP IPv4/IPv6 单栈)
warp d (WARP 双栈)
warp c (安装 WARP Linux Client,开启 Socks5 代理模式)
warp l (安装 WARP Linux Client,开启 WARP 模式)
warp i (更换支持 Netflix 的IP)
warp e (安装 Iptables + dnsmasq + ipset 解决方案)
warp w (安装 WireProxy 解决方案)
warp y (WireProxy socks5 开关)
warp s 4/6/d (优先级: IPv4 / IPv6 / VPS default)图示流程

测试是否配置成功
执行ip addr,如果出现了一个 wgcf 的网卡,说明配置成功,或者直接执行ping -4 google.com测试能 ping 通。
root@Debian:~# ping -4 google.com
PING  (142.251.36.14) 56(84) bytes of data.
64 bytes from ams15s44-in-f14.1e100.net (142.251.36.14): icmp_seq=1 ttl=119 time=2.40 ms
64 bytes from ams15s44-in-f14.1e100.net (142.251.36.14): icmp_seq=2 ttl=119 time=2.62 ms
64 bytes from ams15s44-in-f14.1e100.net (142.251.36.14): icmp_seq=3 ttl=119 time=2.78 ms
64 bytes from ams15s44-in-f14.1e100.net (142.251.36.14): icmp_seq=4 ttl=119 time=2.68 ms到这里所有都配置成功了。接下来的使用就和一个普通的服务器没有太大区别了,你可以用来做任何事情,我是用来运行一个没人看的博客,套上 CF 速度感觉还不错:)
Sooner or later, everything ends.